Hello!
To ensure that your order and artwork goes smoothly, please carefully read the below; how to supply a file for print. We're here to help and if you require a file handling service, we'll be more than happy to assist. By supplying a file to print, there are three options to choose from while placing an order;
- Print Only is the equivalent as a black belt in the arts and is our free option where your print ready PDF will be printed as supplied. We recommend this service only to individuals who fully understand our print ready requirements, who are completely confident that their PDF files have been supplied correctly.
- File Check is a safety net option, where the print ready files are double checked by our Pre Press team before being sent for printing. Prices start at £5 + VAT. You can also order a digital PDF Proof for an additional £5 + VAT.
- File Assist turns any finished design into a print ready PDF and includes a PDF Proof. Prices start at £15 + VAT. Choose Design to have our expert team create the artwork for you. Simply choose this option at the point of ordering to receive a quote, then supply a brief at the end of your order. This service includes a free of charge PDF proof.
What is included in your Just Print File Checking Service?
Print Only is our free artwork service, where we will "Just Print" your print ready PDF, as supplied.
We recommend this service only to individuals who fully understand our print ready requirements. Before using this service, you should be confident that your PDF files have been supplied correctly, otherwise please select our File Check or File Assist service. Please refer to our File Checking Comparison Chart to see what is included in each service.
The following terms apply when using the Print Only service:
-
- Your job will be processed through our automated system and rejected only if we unable to print your file.
- Files must be PDF/x-1a format.
- We will not carry out any pre-flight / quality checks on your document as it will already have been carried out by yourself prior to submitting the file.
- You will not receive a proof.
- Booklets and folders are particularly complex and are generally higher value items, therefore we strongly recommend File Check on these products.
- When using this service to order booklets, artwork should be supplied as one multi-page PDF containing single pages in the correct order.
We will fix these errors within your file:
-
- Convert RGB to CMYK
- Convert spot colour to CMYK
< - Missing bleed
- Ink coverage over 340%
- Overprints set on colours other than black
- Proportionately scale
We will notify you of a file rejection if your file contains any of these errors:
-
- Corrupt PDF
- Un-embedded fonts
- Password protected
- Sizes that are disproportionate
- Incorrect number of files
What is included in your File Check Artwork Service?
File Check offers a safety net of a double check on your print ready file before proceeding to print.
We will accept a Print Ready PDF, as well as Print Ready EPS, TIF or JPG files. We will assume your file has been designed and prepared correctly, adhering to our Print Ready requirements, and you can also choose to receive a digital proof for an additional fee.
We will automatically fix these errors within your file:
-
- Convert JPG, TIF or EPS to PDF
- Convert RGB to CMYK
- Convert spot colour to CMYK
- Overprints set on colours other than black
- Ink coverage over 340%
- Missing bleed
We will warn you if your file contains any of these errors:
-
- Text / objects too close to the edge of the page
- Low resolution images
- Impure blacks
- Incorrect panel sizes on folded jobs
- Issues with the form cutter guide lining up with your artwork
- No allowance for creep within your booklet
We will reject your file if it contains any of these errors:
-
- Corrupt file
- Un-embedded fonts
- Password protected
- Sizes that are disproportionate
- Missing elements from the file
- Incorrect number of files
What is included in your File Assist Service?
File Assist File Assist turns any finished design into a Print Ready PDF and includes a PDF proof
We will accept artwork files from the Adobe Creative Suite (Illustrator, Photoshop and InDesign), Corel Draw or Microsoft Office (Word, Publisher and Powerpoint). We will convert your design file into a Print Ready PDF and provide up to 2 proofs to ensure you are happy with the job before it goes to print.
We will fix these errors within your file:
-
- Convert your file to a print ready PDF
- Convert RGB to CMYK
- Convert spot colour to CMYK
- Proportionately scale
- Ink coverage over 340%
- Missing bleed
- Overprints accidentally set on colours other than black
We will warn you if your file contains any of these errors:
-
- Text / objects too close to the edge of the page
- Low resolution images
- Impure blacks
- Incorrect panel sizes on folded jobs
- Issues with the form cutter guide lining up with your artwork
- No allowance for creep within your booklet
We will reject your file if it contains any of these errors:
-
- Corrupt file
- Un-embedded fonts
- Password protected
- Sizes that are disproportionate
- Missing elements from the file
- Incorrect number of files
Artwork Sizes
| Size (mm) | Size inc bleed (mm) | |
|---|---|---|
| A1 Size | 840mm x 594mm | 846mm x 600mm |
| A2 Size | 594mm x 420mm | 600mm x 426mm |
| A3 Size | 297mm x 420mm | 303mm x 426mm |
| A4 Size | 210mm x 297mm | 216mm x 303mm |
| 1/3 A4 Size | 98mm x 210mm | 104mm x 216mm |
| A5 Size | 148mm x 210mm | 154mm x 216mm |
| A6 Size | 105mm x 148mm | 111mm x 154mm |
| Business Card Size | 85mm x 55mm | 91mm x 61mm |
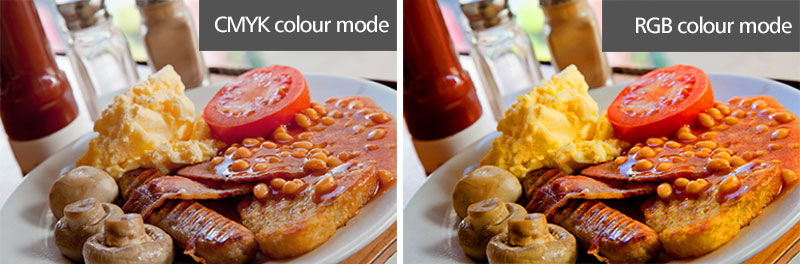
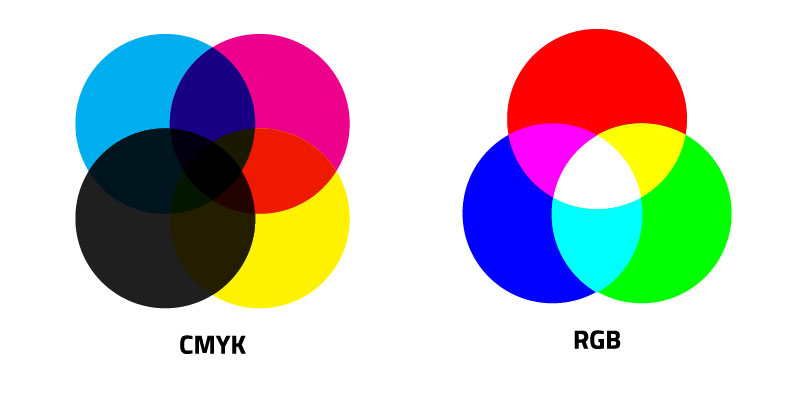
RGB vs CMYK
Please ensure that all colours and embedded images are saved using a CMYK colour profile. While RGB images look good on your screen, they will alter significantly when printed out at CMYK, make sure to design and look at your design in CMYK colours before sending it to print. This way you get no surprises only top quality print from us.
Any images using RGB will be converted to CMYK in our workflow, and this may result in a colour shift. Please be aware that CMYK colour profiles can often loose some colour vibrancy that you may see on your design on the screen. When sourcing images, always use professional images as low-quality images will only downgrade your designs.
Vector & Bitmap Colours
Once printed, areas of colour in your artwork which have vector fills will appear differently to bitmap fills, even when the colour values are identical. This creates a visible join between the elements where vector colour meets bitmap colour, and will become more pronounced if RGB colour has been used as RGB will be automatically converted to CMYK. Instead, extend your bitmap colour out in a bitmap package, such as Photoshop, to avoid the joining of vector and bitmap colours completely.
Using Single Colours - best practices
Within your designs, avoid using large areas of solid colour consisting only of Cyan, Yellow, Magenta or Black. These colours can be prone to banding, so instead try to usefills which consist of two or more of these colours.Overprint Colours
Any fills or lines set to overprint will not print in the way shown in your design file, as the inks are transparent. To check for overprints, view your print ready PDF in Acrobat Professional, and from the drop down menu Advanced / Print Production, activate Overprint Preview. In this view you can check for any overprints left on your artwork.
Screen / Monitor Colours
When viewing the colours in your job on-screen, you are looking at colour which is made up of red, green and blue light, and these colours cannot be exactly replicated with ink on paper. How colours appear on-screen will also vary depending on how your monitor is calibrated. So please always choose your colours from a Pantone book or a CMYK chart for a predictable result.
The colours in your PDF will also vary depending on which simulation profile you are using to view it in Acrobat.
Large format printing and digital printing inks
Large format printing and digital printing use different print technologies and inks to lithographic printing, which means colours may not be an exact match when compared to your litho jobs. If you are submitting jobs for both litho and large format or digital printing, please be aware you may notice a slight variance in common colours.
Fountain Fills & Transparencies
We cannot accept artwork for spot colour jobs containing fountain fills, however fountain fills are accepted for full colour jobs.
Please flatten any transparencies in Adobe Illustrator or InDesign prior to submitting your file. If transparencies are present, please ensure that you do not use multi-layer transparencies (two or more transparencies sitting on top of one another) as this may not give the desired result once processed through our PDF workflow.
Please do not use transparencies in any files containing spot colours. Transparencies are flattened and spot colours converted to CMYK during the same process, and this complex simultaneous conversion can often give an unexpected end result.
If your spot colour job contains a fountain fill, we can edit this for you using our File Assist artwork service, however we cannot accept Microsoft Word or Publisher files with transparencies.
Bleed
Bleed is required on artwork when images, colour or text reach the edge of your page. To create a bleed, simply extend your image, colour or text 3mm over the edge of the page. Alternatively, you can use the bleed settings within your design software to add bleed automatically to your PDF. When creating a print-ready PDF, ensure the PDF is large enough to incorporate the bleed.
If you supply a job without bleed we will automatically enlarge it to cater for this. If you have text close to the edge it may be fractionally cut off once the file has been enlarged. Please be aware on Just Print we do not check for objects that are too close to the edge.
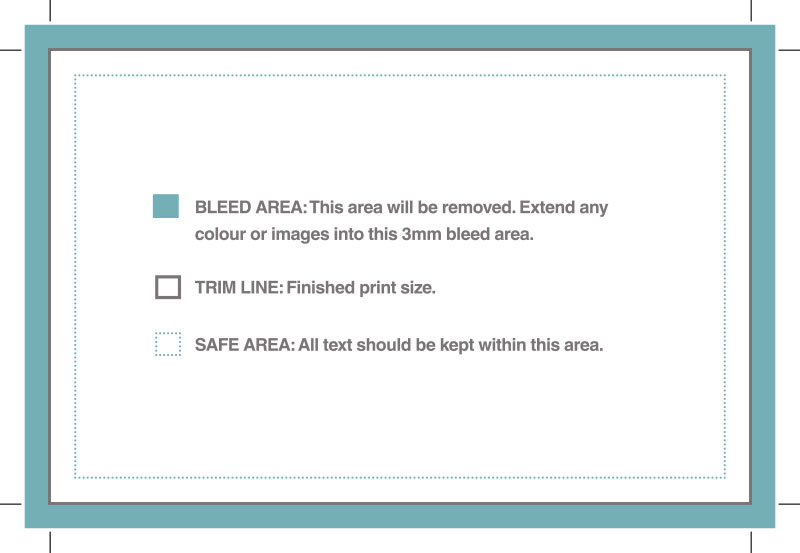
A quiet border is an area within your artwork which does not contain text, images or logos. Please include a quiet border of at least 5mm from the trimmed edge of your artwork. This avoids any part of your design appearing too close to the edge of the page and will give your job a more professional appearance.
Please include crop marks in your print-ready PDF. Crop marks can be added by ticking the “crop marks” option when you create the PDF from your artwork file.
The minimum font size on printed jobs should be 5pt, and we recommend using 100% black for text smaller than 12pt.
You are free to use whichever fonts you please, but please be aware that our designers may not have the same fonts installed on our computers. This means that when we check your design before it is printed, we may encounter some errors, and the font you have chosen may not be properly displayed, meaning another font may be substituted in its place.
For this reason, we would recommend outlining any fonts you have used, once you are absolutely sure that you’re happy with the final product. This way, your font is converted to shapes, which are accessible on all devices and machines.
Alternatively, you may wish to embed your fonts into the design file (usually associated with PDFs).
Finally, you may be able to save your final design as a rasterised image file (JPEG or PNG). This may not necessarily the best option, as a rasterised file lack the same functionality as other files, but it will ensure that your fonts will be displayed in print exactly as expected in your design.
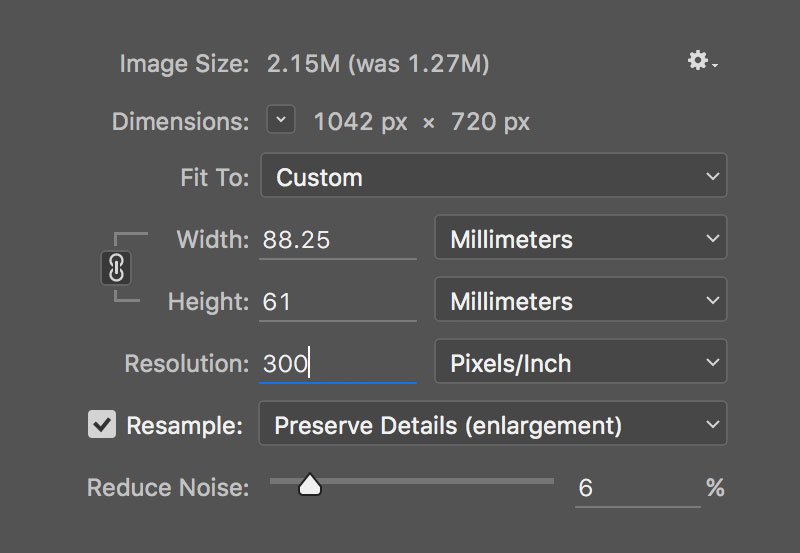
Image Resolution
Resolution generally refers to the dots that make up an image or graphic. Most images are made up of small dots, which we measure in dpi (dots per inch). On your screen or phone, you will likely have an image that is being displayed through the screen at 72dpi. This will be look fine on your screen when being designed, but when printed, 72dpi images or graphics will be blurry and pixelated.
Images used in artwork files for small format print should be high resolution, the standard for which is 300dpi (dots per inch). The lower the dpi of your images, the worse they’ll look when printed, so please bear this in mind when sourcing and manipulating images for your job. Any images above 450dpi will be downsampled to 300dpi in our workflow. For large format print we recommend a resolution of 150 dpi.
Images saved directly from websites are likely to be between 72 and 96dpi, and are therefore unsuitable for print.
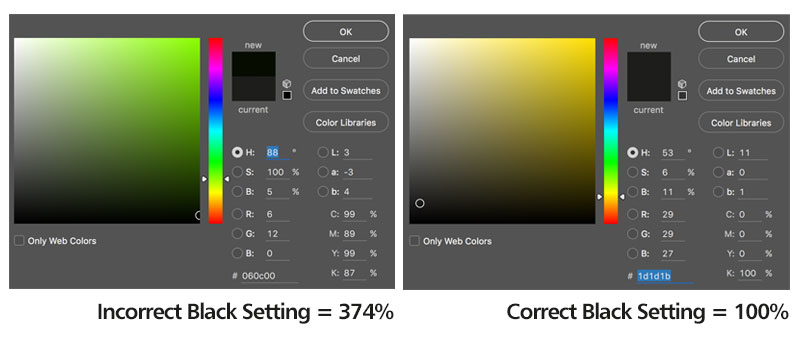
Ink Coverage & Black
Where possible, do not exceed 300% ink coverage within your design file. High ink coverage takes longer to dry and may result in set-off and a delay to your job. You can work out the total ink cover percentage by adding together the C, M, Y and K values. Our corrective software will reduce any ink coverage between 340-400% down to 340% by altering the CMYK values to produce a similar colour. This can be avoided, however, by ensuring colours are a maximum of 340%.
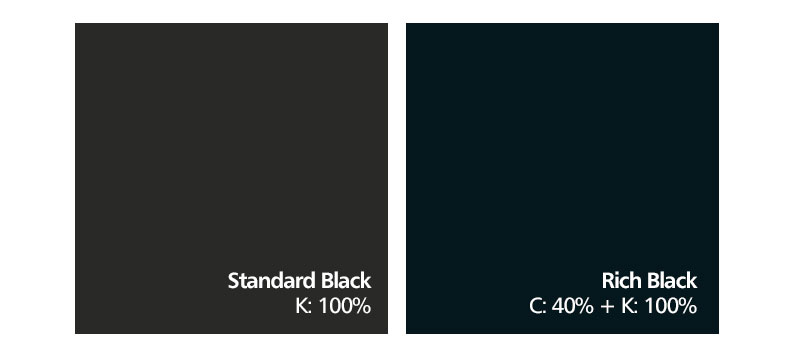
Using Black - best practices
Your artwork should use the colour value C0 M0 Y0 K100 for all black text and black fills. We’d recommend using black for any text below 12pt, as small coloured text may not look as sharp once printed or may cause mis-registration. For large, solid areas of black, we’d recommend adding 40% Cyan (C40 M0 Y0 K100) for a deeper looking black, known as ‘rich black’.
Due to the ink tolerances involved in the four colour printing process, slight variance in finished printed colour is inevitable. This means that although your job will be printed within tolerance, and to ISO standards, the finished colour may turn out to be slightly different to expected, and may not be an exact match to the original colour in your design file. Subsequent reprints may differ in colour slightly from previous print runs, but this is perfectly normal and always within tolerance.
For jobs with multiple set-ups, such as booklets, there may be a variance in colour within the job itself, but this variance will be slight, if at all, and again within tolerance.
The type and colour of paper you choose for your print job may affect the final printed colours within the job as all inks are transparent. For example, printing on an off-white paper stock may produce slightly darker colours than anticipated.
Similarly, there will be a visible difference in colour between a job printed on coated paper and another printed on uncoated paper. For example, common colours may appear different when printed on full colour letterheads on 120gsm bond, and full colour business cards on 400gsm silk. Adding a gloss or matt lamination will also have a noticeable effect on the appearance of your printed colour.
Colour Profiles
The output press profile we use is ISOcoated_v2_eci.icc so all images within your file will be converted to this profile. Any other profiles used in your file will be overwritten. We can send you a copy of this profile to use when designing your artwork, although this isn’t necessary as this industry-standard conversion profile gives consistently good results.
When supplying Forme Cut jobs, please also supply a PDF of the cutting forme you require. This should consist of a hairline set at 100% M or 100% K in the exact shape and size of the cuts and creases you require. Cuts should be denoted by a solid hairline, while creases should be denoted by a dotted hairline. We also require a visual showing your template overlaid on the print file, which we will use to ensure the job is produced correctly.
There are 3 folder sizes to choose from, DL, A4 or A5, which are oversized to accommodate that paper size, i.e. the A4 folder will accommodate A4 sheets with room to spare. Business card slots are available on most folders, please specify when ordering if you’d like these included or not and adjust the template supplied accordingly.
Before designing your folder artwork, please download the correct folder template and use this as a guide. Click here to download templates for Interlocking Folders or click here to download templates for Glued Folders.
When supplying folder artwork, please submit 2 files, one with the template visible and overlaid on your artwork so we can check that the artwork meets our specifications, and the second with the template removed leaving only what you wish to be printed. The second file will be proofed and printed. Remember to include a 3mm bleed on all folders.
All poster artwork should include a 3mm bleed and a quiet border of at least 10mm, regardless of their finished size. However, if the finished product is to sit inside a frame, provide a quiet border the size of this frame. Image resolution should be no lower than 150dpi.
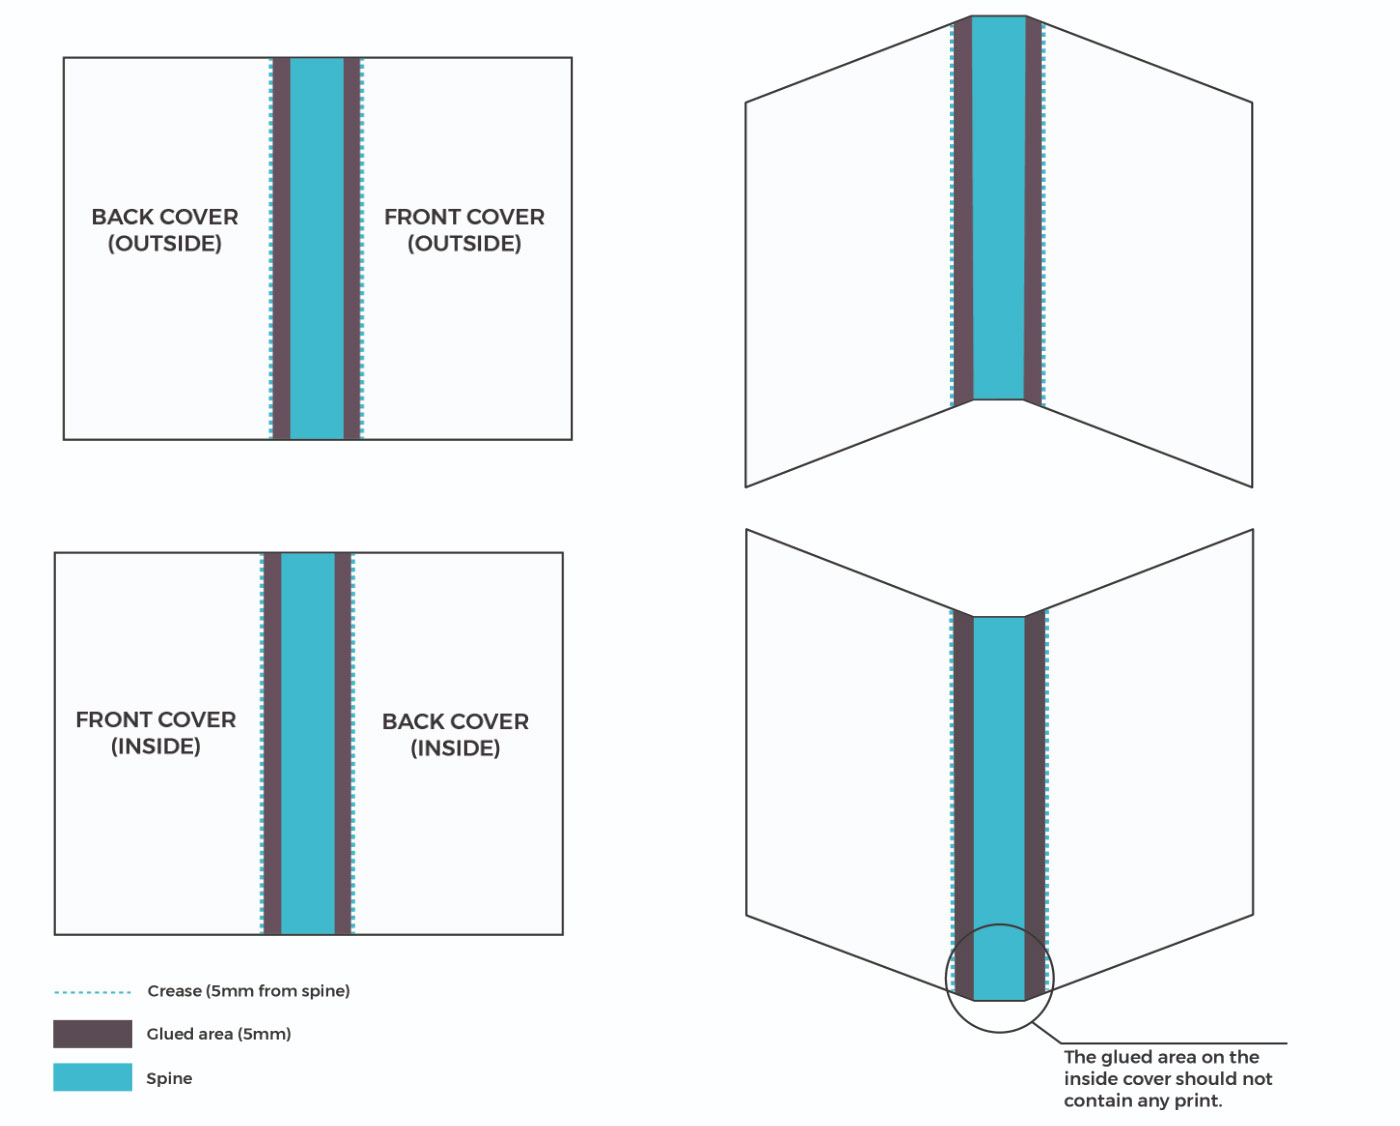
Please supply your perfect bound booklet as 2 PDFs. We require a two page PDF with the outer cover and inside cover set as spreads with the spine included, and a separate PDF with the inner pages running in order from start to finish. For example, an 80 page booklet will have a two page PDF containing pages 80, 1 and 2, 79 set as spreads and a multi-page PDF running in page order from page 3 to 78. The total number of pages must be divisible by 4. We recommend you avoid content which crosses two adjoining pages.
The closer to the centre pages of a booklet, the more has to be trimmed off the page edges. While our imposition software makes allowances for this, it is not recommended to have text or images too close to the edges of your booklet pages. We recommend a gap of at least 5mm on all edges and that you move all important content in from the binding edge by 10mm.
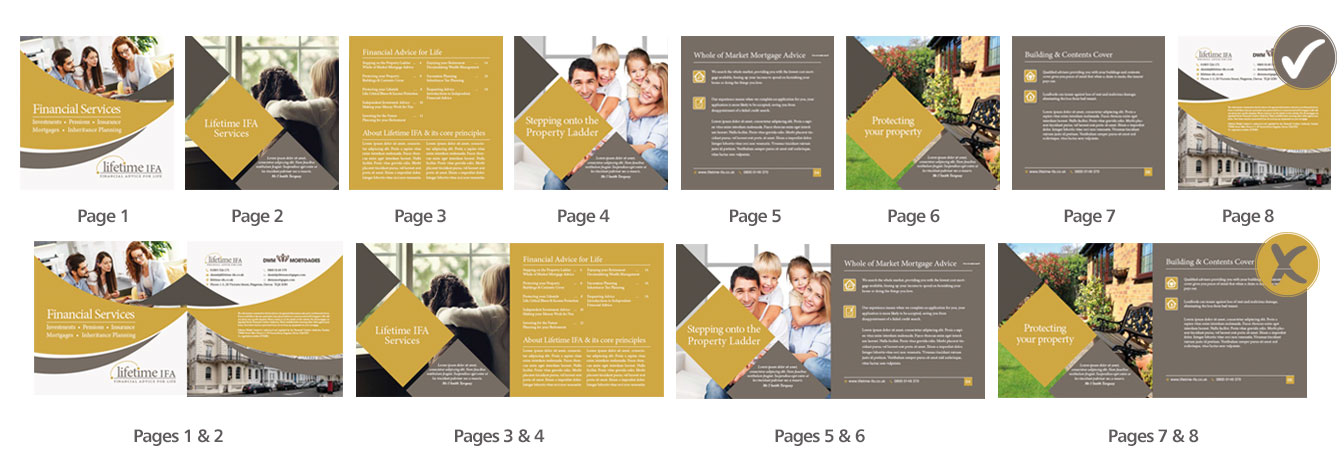
Please supply your booklet in single page format, in the correct running order from start to finish, for example a 20 page booklet will run from pages 1-20 with page 1 being the front cover and page 20 being the back cover. Please do not supply your booklet as printers’ pairs or as spreads. The total number of pages must be divisible by 4. We recommend you avoid content which crosses two adjoining pages.
Booklet Artwork
Page OrderThe total number of pages must be divisible by 4. Please supply your booklet in single-page format, in the correct running order from start to finish, for example a 8 page booklet will run from pages 1-8 with page 1 being the front cover and page 8 being the back cover. Please do not supply your booklet as printers’ pairs or as spreads. We recommend you avoid content which crosses two adjoining pages.
Creep
The closer to the centre pages of a booklet, the more has to be trimmed off the page edges. While our imposition software makes allowances for this, it is not recommended to have text or images too close to the edges of your booklet pages. We recommend a gap of at least 5mm on all edges.
Supplying your booklet
Please supply your booklet artwork as a single, multi-page PDF in the correct running order, with each page the correct size.
Please supply your booklet in single page format, in the correct running order from start to finish, for example a 20 page booklet will run from pages 1-20 with page 1 being the front cover and page 20 being the back cover. Please do not supply your booklet as printers’ pairs or as spreads. The total number of pages must be divisible by 4. We recommend you avoid content which crosses two adjoining pages.
How do I add a bleed to my booklet or brochure artwork?
Booklet and brochure artwork should have a 3mm bleed when the artwork features a solid colour going right to the edge of the page. To create a bleed, simply extend the colour 3mm over the edge of the job ensuring your PDF page size is large enough to accommodate this. Alternatively, bleed can be added in the settings of your design software.
If you have an image, such as a photograph, which reaches the edge of your page, please move this image 3mm off the page edge to create the required bleed, bearing in mind that this 3mm will be chopped off.
Your software may only generate bleed on 3 edges which is suitable when all odd numbered pages need bleed on the top, bottom and right-hand edges, while even numbered pages need bleed on the top, bottom and left hand sides.
If you order more than one set of business cards, we expect the same number of artwork files. For example, if you order 4 double sided business cards, we require 8 pieces of artwork, even if you have a common piece of artwork for the back of the cards.
Please submit the artwork in a way that allows the fronts and backs to automatically back up correctly. Either, supply 1 multi page PDF file running in order, i.e. front, back, front, back etc, or submit each card as its own PDF, with one side per page, i.e. a front and a back.
If we are missing any files or if we cannot determine the order, we may unfortunately reject your artwork.
Can I add text to my artwork on top of the pdf?
No, please do not add text to an existing PDF in Acrobat, either using the Typewriter Text tool or as a comment or note, as it will not show up once printed.
For example, if you are customising a flyer PDF template with your own contact details, you would have to open the template in a recognised design package, make the changes, and then create a new PDF. Alternatively, rasterise the PDF with text added in Photoshop (in CMYK mode at 445dpi) which will flatten the text into bitmap format, save as either a tiff or high quality jpeg, then convert this back into a PDF.
Should I use overprint in my artwork?
Large areas of black should be set to overprint, however everything else should not be. If you have other colours set to overprint then the final printed colour will not be as expected.
Overprint Colours
Any fills or lines set to overprint will not print in the way shown in your design file, as the inks are transparent. To check for overprints, view your print ready PDF in Acrobat Professional, and from the drop down menu Advanced / Print Production, activate Overprint Preview. In this view you can check for any overprints left on your artwork.
Fountain Fills & Transparencies
We cannot accept artwork for spot colour jobs containing fountain fills, however fountain fills are accepted for full colour jobs.
Please flatten any transparencies in Adobe Illustrator or InDesign prior to submitting your file. If transparencies are present, please ensure that you do not use multi-layer transparencies (two or more transparencies sitting on top of one another) as this may not give the desired result once processed through our PDF workflow.
Please do not use transparencies in any files containing spot colours. Transparencies are flattened and spot colours converted to CMYK during the same process, and this complex simultaneous conversion can often give an unexpected end result.
If your spot colour job contains a fountain fill, we can edit this for you using our File Assist artwork service, however we cannot accept Microsoft Word or Publisher files with transparencies.
Colour Banding
Within your designs, avoid using large areas of solid colour consisting only of Cyan, Yellow, Magenta or Black. These colours can be prone to banding, so instead try to use fills which consist of two or more of these colours.
Don't have your own artwork?
If you need an artwork package, you simply need to mention it in the notes when you place your order or call us on 0800 246 5137. We will contact you to discuss the package that best suits your requirements. You don’t need to add anything extra to your cart.
If you need an artwork package, you simply need to mention it in the notes when you place your order or call us on 0800 246 5137. We will contact you to discuss the package that best suits your requirements. You don’t need to add anything extra to your cart.